• Email
  • Facebook
  • Instagram
  • Pinterest
share our JOY

JOY{filled}family

striving to radiate Him always

  • Home
  • Blog
  • Brown Scapular
  • Liturgical Calendars & Planners
  • Wellness
    • Essential Oils
    • Fitness
    • Nutrition
  • Homeschool
  • Sacraments
    • Baptism
    • First Communion
    • Confirmation
  • Girls’ Groups
    • Rosa Mystica Girls’ Society
    • SS Little Flowers

Colors of Piety Frame

November 22, 2010 by Lena {JOYfilledfamily} Filed Under: Crafts, Little Flowers, Piety, St. Cecilia

colors of piety of frame joyHere’s the latest Little Flowers creation, a Colors of Piety Frame.    It was created to help the girls remember their lesson on the virtue of piety and St. Cecilia.  It was fairly simple but required adult supervision due to the use of hot-glue guns.  The girls plan to use their piety frames for their home/bedroom altars.

supplies joy
Supplies:

  • colored popsicle sticks – one of each color/frame (Dollar Tree Store) $1/pack (16/color)
  • reg. popsicle sticks – 1 and 1/2 per frame (Dollar Tree Store) $1/pack
  • scissors
  • hot-glue gun
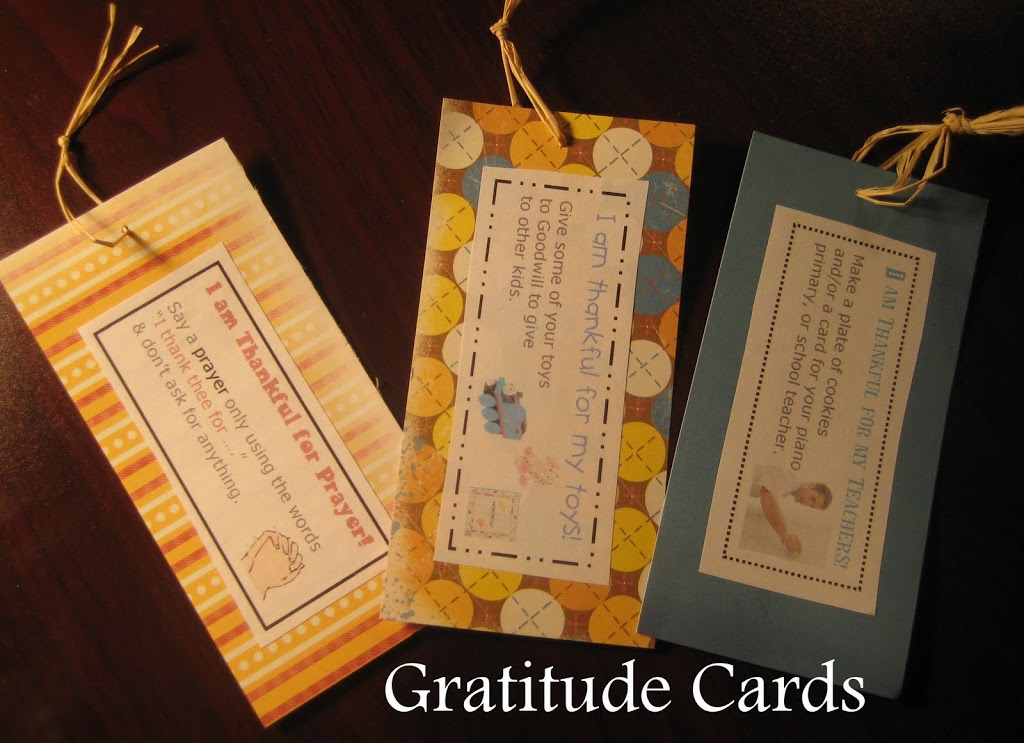
  • colors of piety cards (can be printed from here)

steps joy


Directions:
Prep:

  • print colors of piety cards
  • laminate cards
  • trim cards
  1. glue one colored popsicle stick on left and right side of card, directly onto the laminated card
  2. glue one colored popsicle stick on top and bottom of card, directly onto the attached popsicle sticks from step #1
  3. glue two colored popsicle sticks onto the back side of the laminated card.  glue each adjoining area.
  4. glue the reg. popsicle stick onto the back/bottom of the laminated card and exposed colored popsicle stick.  slightly angle the popsicles stick upward.  this will serve as the bottom stopper for a picture and stand for the frame.
  5. glue the half reg. popsicle stick onto the reg. popsicle stick that was glued in step #4.
you can keep the frame as is or place a picture into the frame.
The color of piety card was inspired from here, Jessica at Shower of Roses.

Giving Thanks – Craft

November 8, 2010 by Lena {JOYfilledfamily} Filed Under: Advent, Crafts, Thanksgiving 7 Comments

I used this craft for Little Flowers – Perseverance & St. Elizabeth Ann Seton.  My family has made this a Thanksgiving/Pre-Advent Tradition.

The Gratitude Cards are intended to be used from now until the start of Advent – Nov. 28, 2010. 

The the goal is for the children & family to work on preparing their hearts to receive the most wonderful gift, Jesus. 

The box was decoupaged with a picture of Our Blessed Mother, Lord Jesus Christ, and/or another Saint.  It can later be used as a prayer box to store the intentions of family and friends.  The box can also be used for keepsakes such as Rosary, Miraculous Medal, etc.  It also serves as a great gift for another.  We often use the boxes to present a spiritual bouquet to someone dear.

A card is to be randomly selected from the box on a daily basis.  The activity/card selected should be performed by all members of the household.

Here’s an example:  “I’m Thankful for my toys.”  Give some of your toys away to Goodwill so that other children may enjoy them. 

The card is then placed on the hanging twine for all to see.  This serves as a reminder that this task needs to be completed.  It also helps to reflect on what you are giving thanks for.

I put our twine and cards over the fireplace.  The kids love to see what they have completed and what they are thankful for. 

Sparkles couldn’t wait to start her cards.  She was even more excited when she selected the card, "I’m Thankful For Our Car."  Her task was to clean the car and then go out for ice cream cones.  She has never been so happy to clean the car.  She rallied her sisters and went to work.  I even gave a hand.  I couldn’t resist their enthusiasm.


SUPPLIES:

Gratitude Cards:

  • I’m Thankful for… Cards (I printed my cards from here and selected the cards that applied to my family and Catholic Faith.)
  • Scrapbook cardstock (I purchased a 4.5×6 book of Thanksgiving scrapbook papers, found at Michaels)
  • Scissors
  • Glue/double stick tape
  • Hole punch
  • Twine/raffia

Gratitude Box:

  • Paper box (purchased from the Dollar Store or Wal-Mart)
  • Gold Spray Paint
  • Holy Picture
  • Mod Podge
  • Foam Brush

DIRECTIONS:

Gratitude Cards:

  • Print & cut the I’m Thankful for… Cards
  • Trim your scrapbook paper to frame the “Thankful Cards”
  • Adhere the cards to your scrapbook paper
  • Hole punch the scrapbook paper with card
  • Thread a piece of twine/raffia in the hole and tie onto the hanging twine for display

Gratitude Box:

  • Spray paint the brown/paper box with gold spray paint
  • Trim your holy picture as desired
  • Adhere the picture to the box by brushing a thin layer of Mod Podge on the box. 
  • Brush another layer of Mod Podge over the picture and entire top surface of the box.  Repeat as desired, allowing time for drying in between coats.

Father, "I will give thanks to you, O Lord, with all my heart" (Ps 138:1).

All Saints Party

October 30, 2010 by Lena {JOYfilledfamily} Filed Under: All Saints Day, Crafts 7 Comments

candy bowlsWe are anxiously awaiting All Saints Day, a time to give thanks and praise for all of the Church Triumphant.

We plan to attend our parish’s Annual All Saints Eve Party. It’s wonderful to celebrate the feast days at church.

Hopefully, I’ll have their saint costumes ready by this evening and I won’t have to pull off an all-nighter.

I did find time early this morning to create hand-painted goody bowls for a friend who will also be hosting a fabulous All Saints Eve party.  I can’t wait to have some candy share this feast day with our parish community and friends.

candy bowls m candy bowls p

Decorating For Our Lady

October 6, 2010 by Lena {JOYfilledfamily} Filed Under: Crafts, Rosary

wreath on door JOY

Here is my go at a wonderful liturgical wreath for the month of October.  The idea was shared by Tiffany at Family at the Foot of the Cross.  I check her site regularly for her splendid faith-filled liturgical celebration ideas.  However, I checked her site this time around via the Catholic Icing Rosary Round Up.

I knew I wanted to take a go at Tiffany’s creation once I saw it.  My front door has been empty since mid September.  I was a little nervous at first because I really don’t have a budget for extra purchases.  My nerves did not curb my excitement.  I woke up my husband who works nights, to inquire about an old wreath I had.  I thought it was tossed last year in my attempt to organize the garage. 

Thankfully, he was not upset with me and went to search for the wreath.  He found it!  I didn’t doubt him for one minute.  ; )

I decorated the 5+ year old wreath, last year, with up-cycled floral embellishments from a potted plant that I received as a gift.  I added a rosary in the middle as Tiffany suggested.

The children were thrilled with the new creation.

Thanks Tiffany!

oct wreath JOY

Our Lady of the Most Holy Rosary, Ora pro nobis.

Hope Topiary

October 4, 2010 by Lena {JOYfilledfamily} Filed Under: Crafts, Gardening, Little Flowers, St. Monica

Ivy is the flower/plant that coordinates with Hope – Little Flowers Wreath I.  Ivy topiaries are my favorite.  It was an easy choice for me, I decided to have the girls plant an ivy clipping for St. Monica & Hope.   The girls will care for their ivy plants in hope that they will take root and grow to be formed around the heart topiary.IMG_0162

"Hope must encircle and cling to your heart like the climbing ivy."

~ The Catholic Girl’s Guide

  topiary supplies JOY

Supplies:

  • floral wire 20 gauge – 30/pack $1.99
  • floral wire 22 gauge – $2.99
  • wire cutters – $4.99
  • soil (preferably seeding soil) – $5.99
  • planting pots – $1.49/pack (10 in ea pack.  3 packs for 30 girls)
  • ivy – $4.99/pot (2 pots need for 30 girls)

St. Monica Hope Heart Topiary – $1.01 per topiary

Softwood Ivy Cuttings. If time is not a consideration you can take softwood cuttings about 6 to 8 inches in length, remove the lower 2-3 leaves and insert the cutting into some damp sand or vermiculite. Keep it in a warm spot, and the roots should develop fairly rapidly (anywhere from 10-20 days) giving you a new plant.

Instructions:

  1. create heart frame out of the 20 gauge wire
  2. reinforce the heart frame by twisting the 22 gauge wire around the frame
  3. cut the ivy clippings slightly below fresh growth (cut immediately before planting)
  4. fill the pot 3/4 full with soil.  lightly water.
  5. insert the heart frame
  6. insert the ivy clipping into the soil.  use multiple clippings to ensure that one will take.
  7. fill the pot with soil.   lightly water.  be sure that the clippings are firmly set in the soil.
  8. train the ivy growth up the frame

IMG_0158

Ivy topiaries will last and last, given proper care. Bright indirect light and moderately moist soil will keep ivy happy indoors.
The Ivy Heart Topiary is a  low maintenance houseplant that grows quickly and has been trained on the topiary and only needs occasional pruning or guiding to keep it’s shape. Place this topiary in bright indirect light and keep the soil evenly moist.   – Caring For Your Topiary

Resources

Instructions for topiary growth

How to re-pot a plant

How to grow trained ivy topiary

How to grow and train and ivy plant

  • « Previous Page
  • 1
  • …
  • 5
  • 6
  • 7
  • 8
  • 9
  • …
  • 11
  • Next Page »

Hi! I'm Lena, mama of JOYfilledfamily.
We are a traditional Catholic family striving to live for Jesus Christ in everything we do. We pray to completely surrender our will to His and to become His servants. Our mission of this blog is to share our JOY.

This blog serves as a journal of us making good memories, living the liturgical year, and our spiritual journey.

Subscribe to our Newsletter

  • Home
  • About
  • Blog

Copyright © 2025 swank WordPress Theme <a PDCD